
This is my note for the course "Angular - The Complete Guide (2021 Edition)" which is taught by Maximilian Schwarzmüller on Udemy. This is an incredible course for you to start to learn Angular from basic. The official Angular docs is good but it's not for the beginner.
🍄 PART 1 — Angular 1 - Basics & Components & Databinding & Directives
🍄 PART 2 — Angular 2 - Services & Dependency Injection & Routing
🍄 PART 3 — Angular 3 - Observable
🍄 PART 4 — Angular 4 - Forms
👉 Github repo
👉 Other note (taken before this course): Angular 101
This note contains only the important things which can be look back later, it cannot replace either the course nor the official document!
Docs
Installation
// install nodejs

// install angular CLI
sudo npm install -g @angular/cli@latest
Problems of version?
// npm version 7.5.4 detected.
// The Angular CLI currently requires npm version 6.

// SOLUTION
// using nvm
https://github.com/nvm-sh/nvm

// Check the corresponding versions between nodejs - npm
https://nodejs.org/en/download/releases/
// install a specific version
nvm install 14
// check installed versions
nvm ls
// use
nvm use 14 // node version// check version
npm -v
// if npm version is greater than usual? -> downgrade it
npm install -g npm@6 // eg. for node 14
// check where npm installed
which npm // should return /Users/thi/.nvm/versions/node/v14.15.5/bin/npmCLI
// new app
ng new my-new-app

// serve
ng serve
ng serve --port 4300

// create component
ng generate component <name>
ng g c <name> # shorthand
ng g c <name> --skipTests true # without test files
ng g c <name> --selector <app-name> # with selector

// create directive
ng generate directive <name>
ng g d <name>
My first app
// crate an app / project
// for a moment, choose "No" for first 2 options + CSS
ng new my-first-app
cd my-first-app
ng serve // port 4200
ng serve --port 4300 // custom
Input changes → name changes ⇒ check commit → need [(ngModule)] ← from FormsModule
⇒ two-way binding!
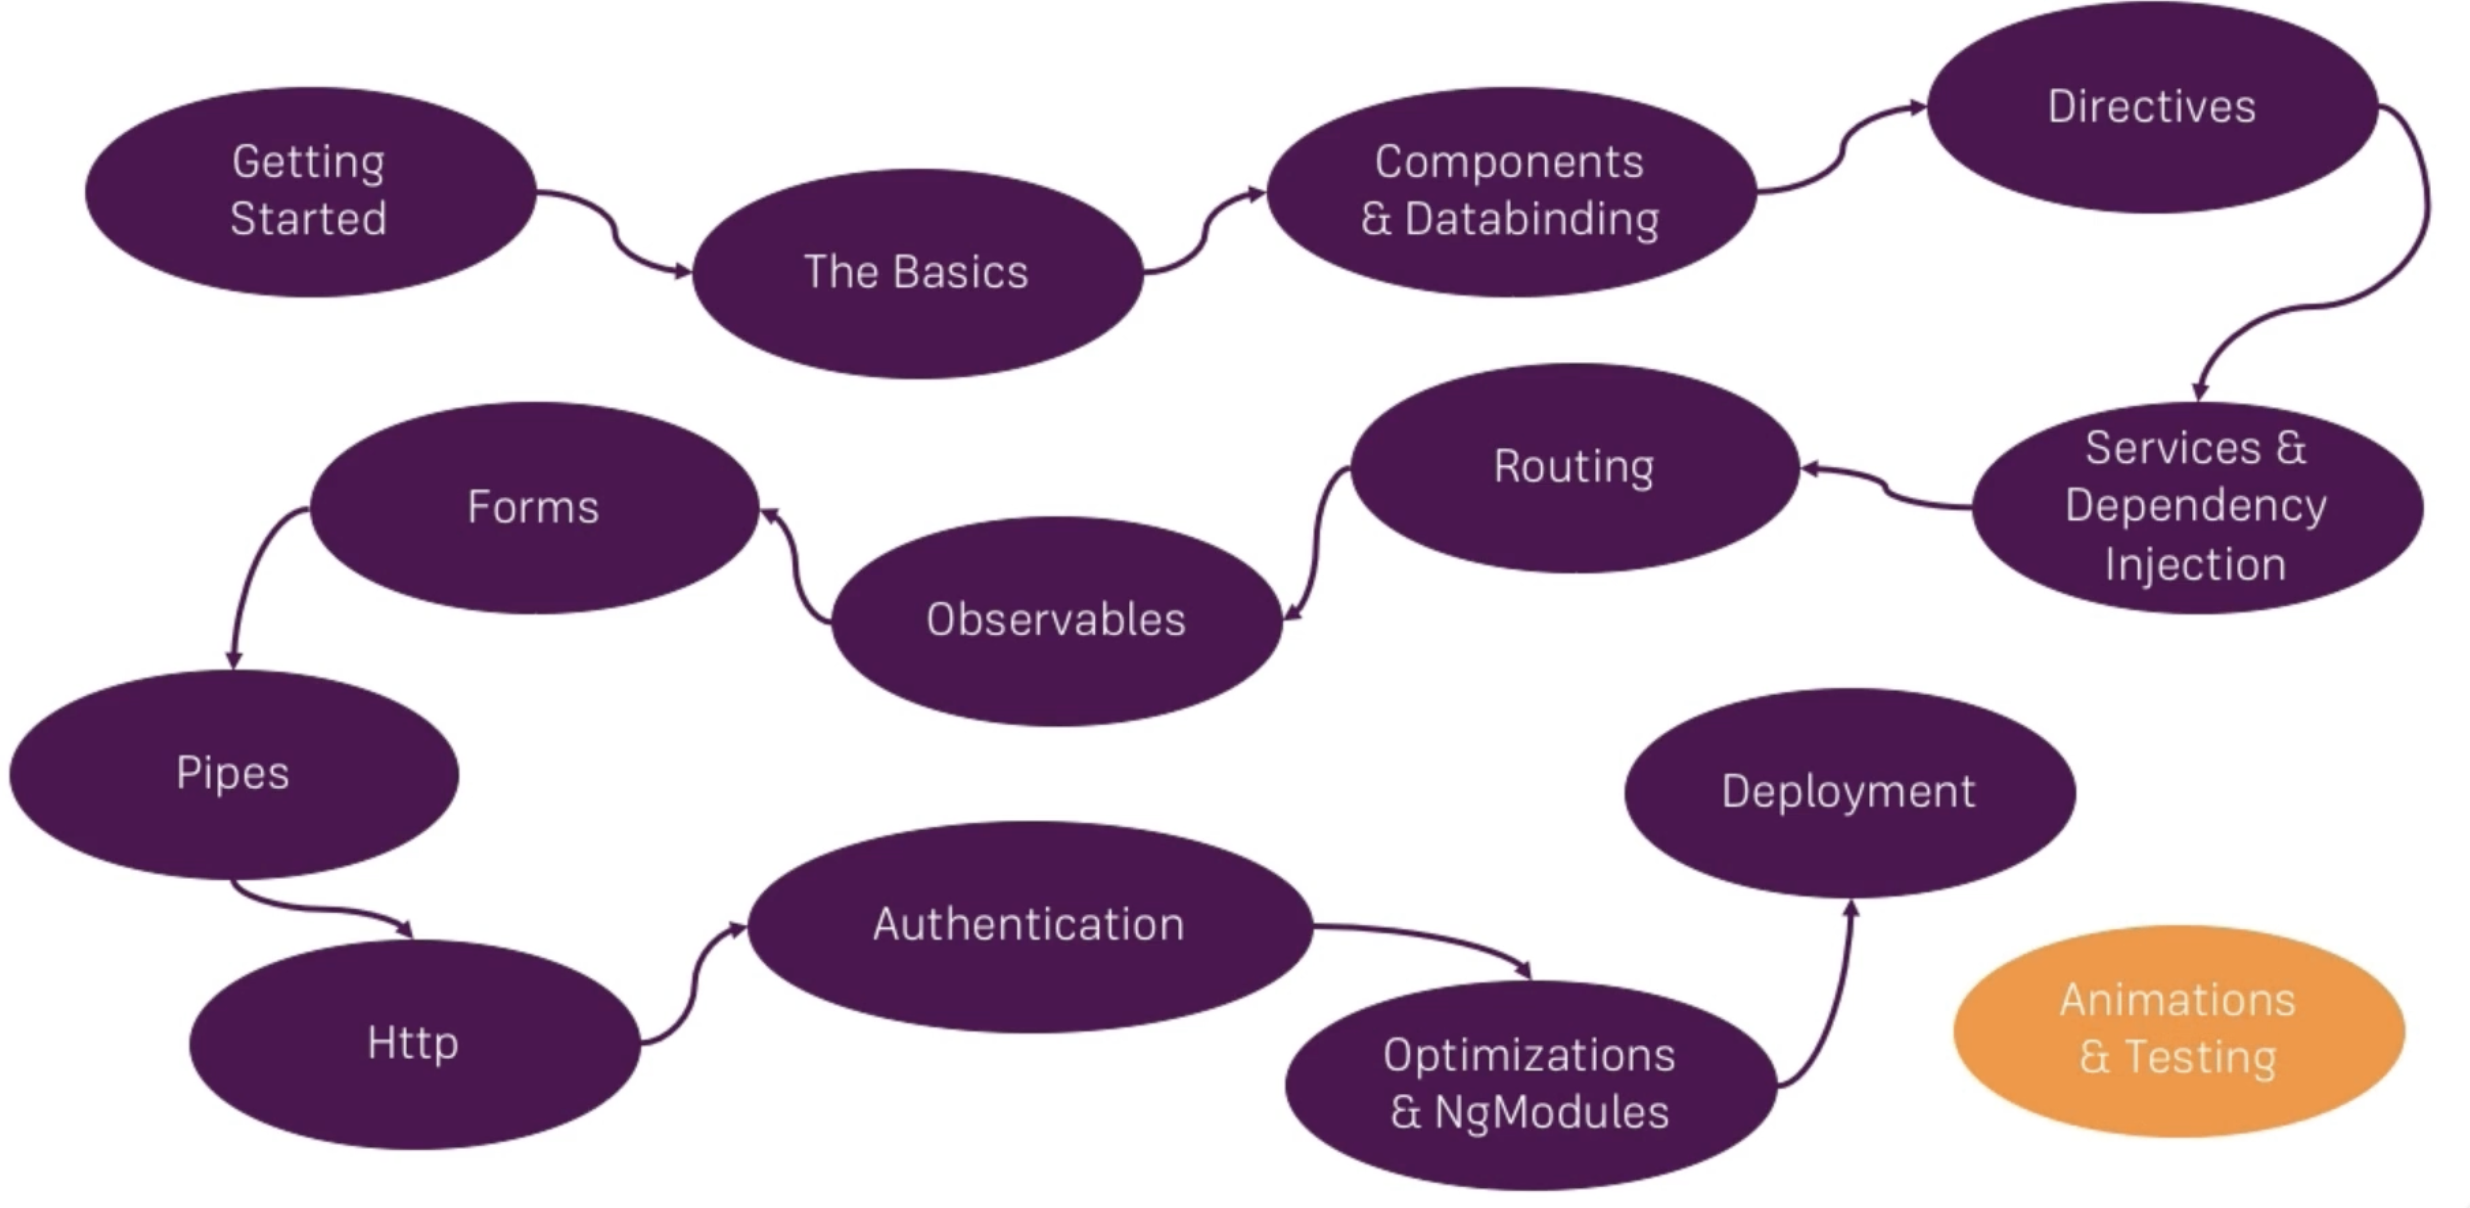
Course Structure
Getting started → The basics → Components & Databinding → Directives → Services & Dependency Injection → Routing → Observables → Forms → Pipes → Http → Authentication → Optimizations & NgModules → Deployment → Animations & Testing
TypeScript
- Superset for JS → define type as you want + check when coding
- TS doesn't run in the browser → compiled to JS before that
Integrate Bootstrap
// cd to project
npm i --save bootstrap

// angular.json
// -> changes "styles"
"styles": [
	"node_modules/bootstrap/dist/css/bootstrap.min.css",
  "src/styles.css"
],

// rerun
ng serve --port 4300
// Check?
// Open page > Inspect > Sources > styles.css -> there is bootstrap there!
Strict mode
Strict mode forces you to write more verbose code in some places (especially when it comes to class properties). ⇒ Disable it!!!!
// Disable "strict mode"
// tsconfig.json
strict: false
Basics
Things I understand more from the course!
How Angular loaded and started?
- All things are in
/index.html← Single Page Application!!! - After
ng serve, there will be a script at the end of the page will be injected by CLI automatically! - First code is executed →
main.ts→bootstrapModule(AppModule)← fromapp.module.ts← there isbootstrap: [](this one is only in app root)
Components
Key feature in angular!
After creating a new component ⇒ Don't forget to add it in module!!!! (if using
ng generate component <module-name>, we don't need to do that manually)ng generate component <name>
ng g c <name> # shorthand
ng g c <name> --skipTests true # without test files
ng g c <name> --selector <app-name> # with selectorSplit up your complex app into reusable components.
Good practice: having folder name = component name
(Convention) Name of component
ServerComponent← normal typescript class with decorator@Component()- Make sure unique selector
<app-server>
- Make sure unique selector
Can use inline in
selector, template, stylesof@Component()→ using backtick ``` for multiple lines.template: `
<app-server></app-server>
<p>abc</p>
`For
selector// as a selector
selector: "app-servers"
// then
<app-servers></app-servers>
// as a class
selector: ".app-servers"
// then
<div class="app-servers"></div>
// as an attribute
selector: "[app-server]"
// then
<div app-servers></div>constructorin class → called whenever component created ← a function of TypeScript!
Databinding
Databinding = communication
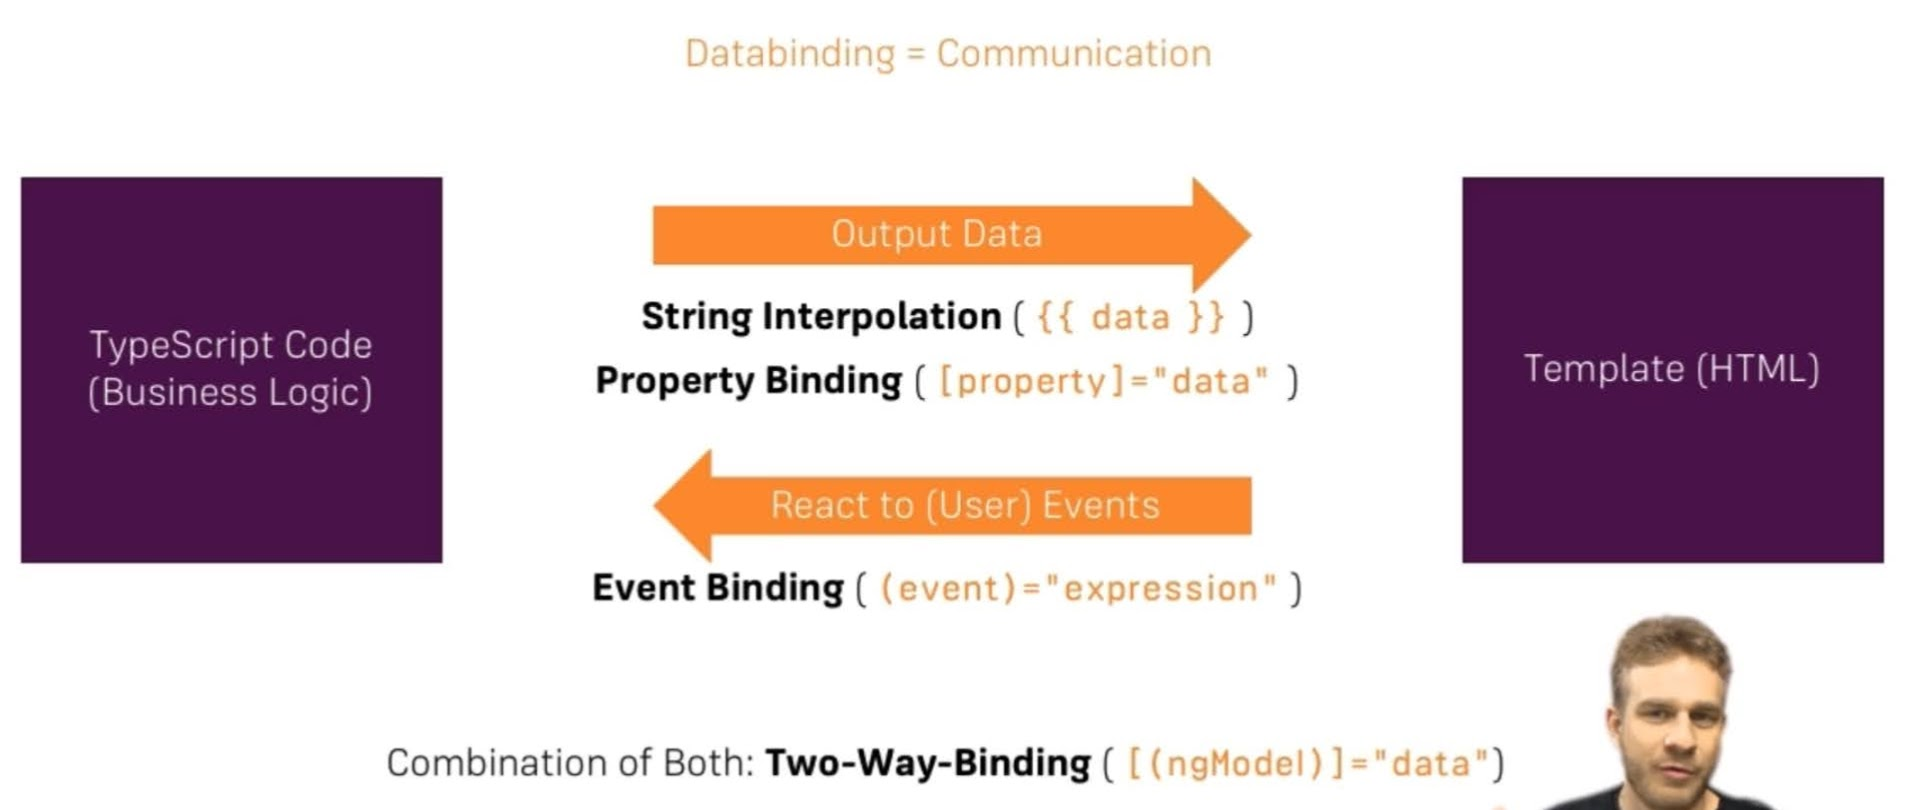
// the same
<p>Server with ID...</p>
<p>Server with ID...</p>
Dynamic binding DOM's properties
<button
	class="btn"
	[disabled]="allowNewServer">Add Server</button>
// disabled is a DOM property
// the same
<p></p>
<p [innerText]="allowNewServer"></p>Event binding
<button
	(click)="onCreateServer()">Add Server</button>
// we don't use usual JS onclick event!

<input
	type="text"
	class="form-control" // bootstrap's class
	(input)="onUpdateServerName($event)">
														//^ event created by (input)

// .component.ts
onUpdateServerName(event: Event){ // "Event" can by "any" but in this case we know it "Event"
	this.serverName = (<HTMLInputElement>event.target).value // can use Inspect to check these child element
									// ^Just tell typescript that our event will be HTMLInputElement
}
Two-way binding → enable ngModel directive!!!
import { FormsModule } from '@angular/forms'Directives
Go to this section.
Model
- Model = a type of file, eg.
recipe.model.ts - Can be used multiple times → write a class → can be extended later!
- Những type chung chung về cái gì đó thì nên làm thành 1 model
// recipe.model.ts
export class Recipe { // <- TYPE!!!
	public name: string;
	public description: string;
	public imagePath:

	constructor(name: string, desc: string, imagePath: string) {
		this.name = name;
		this.description = des;
		this.imagePath = imagePath;
	}
}

// use it?
// .component.ts
export class RecipeListComponent implements OnInit {
	recipes: Recipe[] = [ // using our model "Recipe" but array of Recipe(s)
				// ^ just a type
		new Recipe('Test', 'A test recipe', 'http//img/url'),
		// there can be more...
	];
}

// then use in .html
{{ .name }}, {{ .description }} ... // with *ngFor

// below are the same
<img
	src="{{ recipe.imagePath }}  // string interpolationing
	[src]="recipe.imagePath"     // property binding
>
// ANOTHER WAY OF DECLARING MODEL
// Typescript Constructor Shorthand
export class Recipe { // <- TYPE!!!
	constructor(public name: string, public description: string, public imagePath: string) {}
}
"shared" folder
Containing elements can be used across different features in the project!
Debugging
- Read and understand the error messgaes.
- Sourcemaps ⇒ Open debugger tool in browser (Chrome) >
main.bundle.js> click some checkpoint > jump/open a new file containing the line of code (eg.app.component.ts) ⇒ however, if bundle gets bigger → hard to find - Go to webpack// > ./ > src > all your files with the same structure on your project!!!
- Using Angular Augury (browser extension) > Add another tab in Browser Inspect tool.
- Don't forget to click on "refresh" button on the top-right bar!
Components & Databinding deep dive
- From a big app → how could we split this app (vid)? → We wanna exchange info between child components with parent components.
Binding to custom properties
export class ... {
	element: {
		type: string,
		name: string,
		content: string
	}; // :{} -> not value, it's define a type -> make sure element may only have this type
}

// and if
element = {...} // this's assign value (like normal JS syntax)
By default, all properties of a components can be only used by this component only (not the outside) → That's why we need @Input()
export class ... {
	@Input element: {}
}
// then
<app-server-element
	[element]="serverElement"></app-server-element>
// USING ALIAS?
export class ... {
@Input('srvElement') element: {}
}
// then
<app-server-element
[srvElement]="serverElement"></app-server-element>
// ^has to be "srv...", "element" not working now!Binding to custom events
👉 If the communication between components (by using EventEmitter, input, output,..) are too complicated → check the use of Service! (section "Services with cross-components")
Something changes in the child, we wanna inform parent to know about them.
// parent .html
<app-cockpit
	(serverCreated)="onServerAdded($event)"></app-cockpit>
// parent .component
export class ... {
serverElements = [...];
onServerAdded(serverData: {serverName: string, serverContent: string}) {
...
}
}// child component -> need to EMIT our event
export class ... {
@Output() serverCreated = new EventEmitter<{serverName: string, serverContent: string}>;
// ^just defind the type of event
onAddServer() {
this.serverCreated.emit(...) // .emit is called with EventEmitter object!
}
}new EventEmitter<void>(); // event without any information to emit!
onSelected() {
this.recipeSelected.emit(); // without element to emit
}// USING ALIAS?
// parent .html
<app-cockpit
(srvCreated)="onServerAdded($event)"></app-cockpit>
// child component
export class ... {
@Output('srvCreated') serverCreated = new EventEmitter<...>;
}
// Only alias can be used outside the component!!!
// Inside the component, 'serverCreated' can be used as usual!// Receive an event and then assign directly (no need any method)?
<app-recipe-list
(recipeWasSelected)="selectedRecipe = $event"></app-recipe-list>
// event comes from "recipeWasSelected" will be assigned to "selectedRecipe"View Encapsulation
Encapsulation = súc tích / ngắn gọn!
CSS classed defined in parent can be used only in parent → they are not applied to child components! ← behavior enforce by angular (not by browser)
// When inspect element, we can see some "strange" attribute
// auto added to tag
<p _ngcontent-eoj-0>....</p>
// make sure this style belongs only to this component
Every styles in css file can be applied to the component they belong to!
Turn off "Encapsulation"? → so classes in parent can affect child component as usual css behavior, i.e. classes defined are applied globally! ← there is no "strange" attribut like
_ngcontent-eoj-0anymore.import { ViewEncapsulation } from '@angular/core';
@Component({
encapsulation: ViewEncapsulation.None // turn off capsulation
_______________ViewEncapsulation.ShadowDom // read more on Mozilla
_______________ViewEncapsulation.Emulated // default, only used inside component
})
Local References in template
Sometimes, we don't need 2-way binding ([(ngModel)]) → using local reference (eg. #input)
Local references can be use with any type of element (not only input) + anywhere in your template (only the template!!!).
// with ngModel
<input [(ngModel)]="newServerName">
<button (click)="onAddServer()"></button>
// component.ts
onAddServer(){}

// with local reference
<input #serverNameInput>
<button (click)="onAddServer(serverNameInput)"></button>
// component.ts
onAddServer(nameInput: HTMLInputElement){}
@ViewChild()
We can access local reference from component.ts by using this decorator!
// in .html
<input #serverContentInput></input>

// in component.ts

// if wanna access selected element inside ngOnInit()
@ViewChild('serverContentInput', {static: true}) serverContentInput: ElementRef;

// if DON'T wanna ... ngOnInit()
@ViewChild('serverContentInput', {static: false}) serverContentInput: ElementRef;
// in Angular 9+, no need to add {static: false} in this case!

// Then we can use property "serverContentInput" in other place in .component.ts
DON'T manipulate the DOM from the component.ts!!!, like
this.serverContentInput.nativeElement.value = 'something';⇒ Use string interpolation or property binding if you wanna output something to the DOM!
ng-content
- Project content into component.
- Everything between
<app-server>Text</app-server>will be lost → angular will not take care about it! → usingng-content
// child html
// put where you wanna to display "Text"
<ng-content></ng-content>

// parent html
<app-server>Text</app-server>
USING MULTIPLE ng-content?
// parent html
<app-child>
	<div header>Text for header</div>
	<div body>Text for body</div>
</app-child>
// child html
<ng-content select="[header]"></ng-content>
<ng-content select="[body]"></ng-content>
// => Think of using ng-containerComponent lifecycle
- A new component created → Angular go into some phases (processes) ← we can hook into these phases
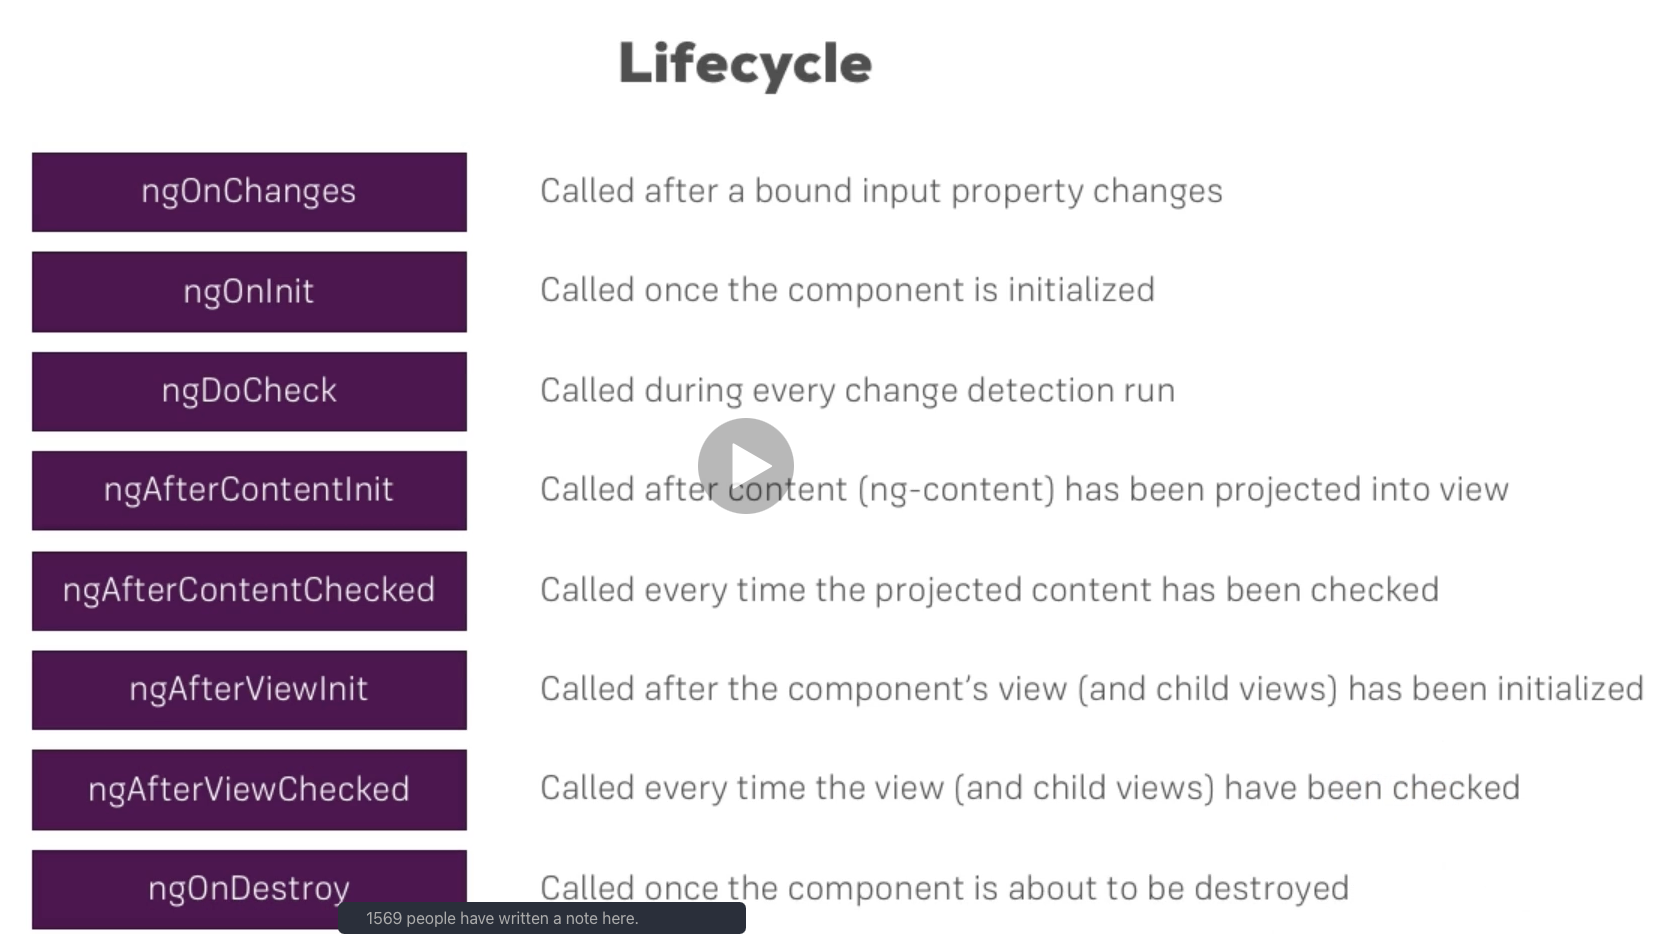
ngOnChanges→ called after bound input property changes (remember@Input()) ← listen to the changesngOnInit→ called once component is initialized (afterconstructor)ngDoCheck→ called during every change detection run → useful when you wanna do something on evert change detection cycle- "Content" in above life cycle hooks ← comes from
<ng-content></ng-content> - Rarely need to use all of them!
ngAfterViewinit→ before that, there is no some view, we cannot do anything with it. Using this hook to make sure that some component is presented in DOM (View)!- We have different "ContentInit" and "ViewInit" here because "Content" and "View" are different. Check more on section "ViewChild" and "@ContentChild" to see the different!
Order on starting
constructor > ngOnChanges > ngOnInit > ngDoCheck
> ngAfterContentInit > ngAfterContentChecked
> ngAfterViewInit > ngAfterViewChecked
// whenever input changes -> ngOnchanges
// whenever there are changes -> ngDoCheck
// How to use?
export class ... implements OnInit, OnChanges, OnDestroy {
ngOnInit() {}
ngOnChanges() {}
ngOnDestroy() {}
}// testing ngOnChanges
import { OnChanges, SimpleChanges } from '@angular/core';
export class ... implements OnChanges {
@Input() element: ....
OnChanges(changes: SimpleChanges) {
console.log('ngOnChanges called!');
console.log(changes);
}
}
// then open Inspect
// in object element: SimpleChange
// there are "currentValue", "firstChange", "previousValue",...// DoCheck
// -> wanna do something on evert change detection cycle
import { DoCheck } from '@angular/core';
export class ... implements DoCheck {
ngDoCheck() {
}
}Whenever there are changes!!!! (event when clicked / Promise back from loaded data,....) > ngDoCheck
// onDestroy()
// Called when component is destroyed -> when removed from the DOM
// Wanna make a test?

// in child component.ts
ngOnDestroy() {
	console.log("ngOnDestroy called!");
}

// in parent html
<button (click)="onDestroyFirst()>Destroy component</button>

// in parent component.ts
onDestroyFirst() {
	this.serverElements.splice(0, 1);
}
@ContentChild()
@ViewChild() is used to access to "local reference" in the same component.
If you wanna access "local reference" in a content → use @ContentChild() (It's not part of the view, it's a part of the content)
// parent html
<app-server-element
	<p #contentParagraph>Text</p>
></app-server-element>
// child html
<ng-content></ng-content>// child component.ts
export class ...{
@ContentChild('contentParagraph') paragraph: ElementRef;
}
// In case you wanna call "contentParagraph" in parent component.ts
// => use @ViewChild() in parent component.ts as usual!Directives
- Directives = instructions in the DOM
- You could/should create a separated folder containing all your custom directives.
Attribute vs Structural
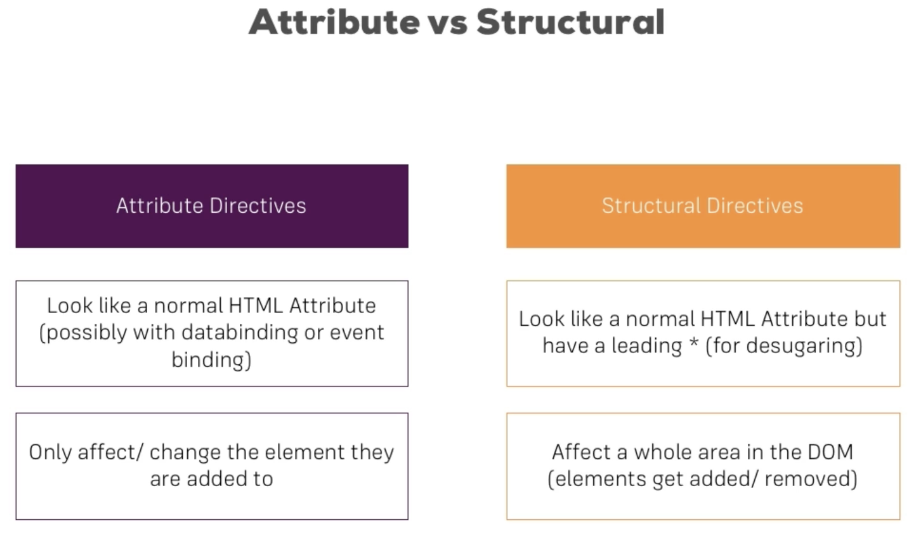
Structural directives
<!-- else -->
<p *ngIf="serverCreated; else noServer">Text</p>
<ng-template #noServer>
	<p>Other text</p>
<ng-template>
// toggle show button
<button (click)="showSecret = !showSecret">Show password</button>
<p *ngIf="showSecret">Password</p>We cannot have more than 2 structurual directives on the same element!
// WRONG
<li *ngFor="..." *ngIf="..."></li>
// *ngFor
<div *ngFor="let logItem of log"></div>
// log has type array, is in .component.ts//index of for
<div *ngFor="let i = index"></div>Behind the scene of *? ← let angular know it's a structural directive → it will transform them into something else (different from property binding, event binding, 2-way binding, string interpolation) ← without *, it cannot separate!
// instead of using * like
<div *ngIf="!onlyOdd"></div>

// we can use (angular will translate *ngIf to something like that)
<ng-template [ngIf]="!onlyOdd">
	<div></div>
</ng-template>
Attribute directives
Unlike structural directive, attribute directives don't add or remove elements. They only change the element they were placed on!
<p [ngStyle]="{backgroundColor: getColor()}">Text</p>
 // ^	  		// ^we can use background-color
 // | "[]" is not a part of directive -> it just tell us that we wanna bind
 //        some property on this directive!

<p [ngClass="{online: serverStatus == 'online'}">Text</p>
//            ^.online class
Unlike structural directives, we can use ngStyle and ngClass in the same element (with another structural directive)
Custom attribute directive
👉 Using Renderer2
In this section, we learn a way to access/modify DOM element inside a directive (or component, class,...)
// CUSTOM DIRECTIVE
<p appHighlight>Text</p>

// .component.ts
// or something.directive.ts (and then import it in .component.ts)
import { Directive, OnInit, ELementRef, Renderer2, HostListener } from '@angular/core';
												//  ^important: use this to not touch directly on the DOM
												//   elements ('cause it's bad practice!)
@Directive({
	selector: '[appHighlight]'
})
export class HighlightDirective implement OnInit {
	constructor(private elRef: ELementRef, private renderer: Renderer2) { }

	ngOnInit() {
		this.renderer.setStyle(this.elRef.nativeElement, 'background-color', 'blue');
	}

	// or listen to some event
	@HostListener('mouseenter') mouseover(eventData: Event) {
							// ^JS event    ^custom name
		...
	}
}
// then add it in .module.ts
@NgModule({
declarations: [appHighlight]
})
export class .... {}Don't wanna use Renderer2?
@Directive({
	selector: '[appHighlight]'
})
export class ... {
	@HostBinding('style.backgroundColor') bgColor: string = 'transparent';
						//	^like normal JS					^custom var		  ^ gives it initial value

	// then access it likes
	ngOnInit() {
		this.bgColor = 'blue';
	}

}
For example, we can let the users choose the color they want instead of 'blue' like above!
// if we wanna use input for custom directive?
<p appHighlight [defaultColor]="'yellow'">Text</p>
// |            ^ we could use defaultColor="yellow" but be careful, we must
// |              be sure that there is no conflict with already-have attributes!
// ^ we could use [appHighlight]="'red'" if there is any alias in the directive

// in .directive.ts
@Directive({...})
export ... {
	@Input() defaultColor: string = 'transparent';
	@Input('appHighlight') highlightColor: string = 'blue';

	// some commands using above 2 inputs.
}
How angular knows defaultColor is an input of directive appHighlight or property of <p>? → it checks your custom directives first, then check the native properties after that.
Custom structure directive
// unless directive
import { Directive, Input, TemplateRef, ViewContainerRef } from '@angular/core';

@Directive({
	selector: '[appUnless]'
})
export class UnlessDirective {
	@Input() set appUnless(condition: boolean) {
				// |   ^make sure the same as the selector!
				// ^a setter of a property which is a method which get executed whenever
				//  the property changes
		if (!condition) {
			this.vcRef.createEmbeddedView(this.templateRef);
		} else {
			this.vcRef.clear(); // remove everything from this place in the DOM
		}
	}

	constructor(private templateRef: TemplateRef<any>, private vcRef: ViewContainerRef {
						   //     ^ what to be applied?                  ^ where to be applied?
														//     ^ look like ElementRef but for ng-template
	}
}

// don't forget to add it to declaration in module.ts
Use *appUnless,
// if using *ngIf
<div *ngIf="!onlyOdd"></div>
// if using *appUnless
<div *appUnless="onlyOdd"></div>*ngSwitch
<div [ngSwitch]="value">
	<div *ngSwitchCase="5"></div>
	<div *ngSwitchCase="10"></div>
	<div *ngSwitchDefault></div>
</div>
// in component.ts
export class ... {
value = 10;
}Project: Dropdown
👉 Check this.
@Directive({
	selector: '[appDropdown]'
})
export class DropdownDirective {
	@HostBinding('class.open') isOpen = false;
	@HostListener('click') toggleOpen() {
		this.isOpen = !this.isOpen;
	}
}
// closing dropdown from anywhere
@Directive({
selector: '[appDropdown]'
})
export class DropdownDirective {
@HostBinding('class.open') isOpen = false;
@HostListener('document:click', ['$event']) toggleOpen(event: Event) {
this.isOpen = this.elRef.nativeElement.contains(event.target)
? !this.isOpen : false;
}
constructor(private elRef: ElementRef) {}
}Dynamic Components
This part is vert later than above parts. However, it talks about components, I put it here. For example, we wanna show error, modal, ....
(Video) → what are "dynamic components"? → it means that they are not always there but they will be there if there are something happens with your codes.
💬 Comments